Creating Your Account
Step 1: Accept the invitation to join UPD Social, sent by the Administrator of your node.
You will receive an email invitation from your server administrator or an active user containing a unique link to join your UDP Social server. Click the link in the email to begin the registration process.
A few things to keep in mind:
- Your invitation link is personal and should not be shared with others.
- Invitation links may expire after a set period of time. If your link has expired, contact your administrator to request a new one.
Step 2: Create Your Account
Once you click your invitation link, you will be taken to the registration page. Fill in the following information:
- A username — This is your unique handle on the network. Choose something recognizable, as other members will use it to find and mention you.
- Your email address — used for account verification and notifications. Use the email address where you received your invitation, or another address you check regularly.
- A password — Choose a strong password of at least 8 characters. You will use this each time you log in.
When you are finished, click Create Account. You may receive a confirmation email — if so, click the link in that email to verify your address before proceeding.
Step 3: Log In
Once your account is created and verified, return to your server’s UDP Social address and log in with your username and password. Your UDP Social address, was set up by your admin and shared in the emails when you created the account, for example “mysocial.udp.social”. You will use this address to access your UDP Social account moving forward.
If you forget your password at any time, click Forgot Password on the login page to reset it via email.
Step 4: Setting Up Your Profile
Your profile is your personal space on UDP Social — it is how people get to know you. Here is how to make it yours:
Profile Photo
- Click on your profile icon
- Select Profile, then select Edit Profile. If you are on mobile, once you are in your Profile, click on the two arrows on the top left .
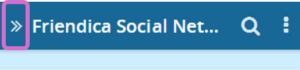
- Select Change profile picture. Upload a photo that represents you — it can be a photo of yourself, an illustration, or anything that feels right
- Recommended size: 300 x 300 pixels
Your Display Name and Description (Bio)
- Select Profile, then select Edit Profile and Personal
- Select a Display name, this is the name people will see on your posts — it can be different from your username
- For example, your username might be udp_kali but your display name could be Kali M.
- Under description, write a short description of who you are
- You can include your interests, location, or anything you would like others to know
Step 5: Navigating the Dashboard for the First Time
When you first log in, here is the dashboard you will see when using a computer:

- Timeline — This is your main stream — see your posts and the posts from everyone you follow, shown in chronological order
- My posts and conversations — This shows only your posts
- Community — Conversations on this and other servers, similar to Timeline
- Messages — Your private conversations
- Contact — Shows a list of your contacts
- Groups — See and manage your groups
- Notifications — Likes, comments, and new followers
The Search Bar At the top of the page — use it to find people, hashtags, and groups.
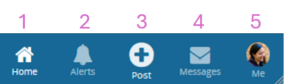
Bottom Navigation Menu (mobile only):
- Home — Your main feed — see your posts and the posts from everyone you follow, shown in chronological order
- Notifications — Likes, comments, and new followers
- The Post circle — This is where you write and share your posts. We will cover that in detail in another blog post.
- Messages — Your private conversations
- Profile — Your personal page
In mobile, to get access to Contacts and Groups, click on the three dots on the top right. You can also find the search icon, use it to find people, hashtags, and groups:

You are all set up and ready to go. In the next section, we will show you how to find your people, start connecting and write your first post.